TracX Mapping User Guide
Starting TracX
What's on the Screen
General Icons
Navigation
This section explains how you can move around the map and zoom into areas of interest.
Zooming In and Out
- Use the + - icons on the right side of the screen to Zoom.
- Use the + key and - key on your keyboard to zoom
- Use the scroll wheel on
your mouse
Mini Map
- Use your mouse to click and drag anywhere on the map to move it.
- Use the arrow keys on your keyboard to move around the map.
Layers
Turning Layers On and Off
- Hover over the Layers icon
- Tick or untick the options desired.
Unplanned Stops
An unplanned stop icon will be displayed at the location where the driver was stopped for a certain amount of time. A driver is considered stopped when their speed is less than 5KM per hour. The time threshold to be considered stopped is different depending on the vehicle -
- Bulk Vehicles - stopping for 1 hour is considered an unplanned stop.
- Parcel Drivers - stopping for 30 minutes or longer is considered an unplanned stop.
If the driver begins a rest break within 2 minutes before or after they have stopped, an unplanned stop icon won't be displayed on the map, it will be replaced with a rest break icon.
Filtering & Searching
- Vehicle Category (e.g. Rigid, Prime Mover, Van, etc.)
- Vehicle (by fleet number)
- Vehicle Branch (branches including headports)
- Vehicle Status (moving or stopped)
- Drivers (by name)
- Driver Branches
- More than (show only drivers with more than entered quantity of jobs)
- Less than (show only drivers with less than entered quantity of jobs)
- Devices (PDA's / devices by asset number)
- Device Status (online or offline)
How to Filter
- Click the Filter
icon to search for specific items on the map.
- Click the name of the required category to expand.
- Click the required field.
- Select or enter the required item(s).
- Click the Search button.
- The selected item(s) will appear.
Favourite Filters
- Private filters are the filters you have created or copied from the Public Filters.
- Public filters are filters created by other users and only their owner can modify them.
- Public filters in your Filters are marked with the
icon next to their name.
- To add a public filter to your Favourite Filters, click on the
icon at end of the filter's name.
- To preview public filters before adding it to your Favourite Filters, click on the filter's name.
- To remove public filter from your Favourite Filters, click on the
icon at the end of the filter's name.
- To hide the Filters and Favourites click the Close button at the bottom right or click the
icon
How to apply filter from Favourite Filters
- Click on the filter's name
- The filter currently applied will have to be highlighted.
- On the Filters page, an information message will show the name of the applied filter.
How to create Favourite Filter
- Click on the Create button
when click on the list drop down.
- Enter the name and specify filter visibility.
- Click on the Create button to save the filter.
How to Edit personal and public filters that you have created
Click the list drop downicon button on Filters page.
- If the filter is public and you are not the owner, you will not be able to edit the filter.
- For filters that you created (public or personal), click on the 3 dots to the right
and you will have the option to select Edit
- Update filter name and specify filter visibility.
- Click on Update.
How to Delete personal and public filters that you have created
- Click the list drop down
icon button on Filters page.
- If the filter is public and you are not the owner, you will not be able to delete the filter.
- For filters that you created (public or personal), click on the 3 dots to the right
and you will have the option to select Delete
- There will be a pop up asking if you want to delete the filter. Click on Delete to confirm
- If you delete a public filter, it will delete it for everyone that has this filter in their list.
How To Search for an Address
- Click the Magnifying Glass
 under the Zoom controls.
 - Type the required street address.
- The search function will being to auto-complete the address as you type.
- Once the correct address is found, either press Enter or click the address from the list.
Viewing More Information about Driver, Vehicle and Device
Finding & Viewing Information
Playback Mode
Switching to Playback Mode
- Select the driver on the Map
- Select the driver by clicking on the driver's icon on the Map
- Click on the playback button
on the 'Driver Details' form
- Using the playback link from the main menu
- Click on the playback button
the on the main menu
- Start typing the driver's name in the search box
- Select the driver by clicking on driver's name in the list
Playback Mode Features
- To start the replay of the driver's route - click on the Start
button
- To pause the replay of the driver's route - click the Pause
button
- To see the current speed of the playback - view the speed icon
- To change the speed of the playback - click the filter
button and click on the speed number to select the speed from drop down.
- To change the date or range – click on the filter
button and click on the date. This opens a calendar and select either the date, or a date range by single clicking the first date and then single click the last date and click Apply (Maximum date range is 7 days).
Timeline
Timeline navigation
- To zoom in or out - use the mouse wheel or press Ctrl + Arrow Up or Ctrl + Arrow Down keys on the keyboard
- To move the timeline - click with the left mouse button and drag left or right or press Ctrl + Arrow Left or Ctrl + Arrow Right keys on the keyboard
- To change the current time - drag the current time indicator
or click on the timeline
Driver route
In playback mode, the driver route is shown as continuous animated points showing the driving direction.
Playback mode layers
Turning layers on and off
To turn layers on and off, perform the following steps:
- Hover over the Layers icon
 .
. - Tick or untick the options are desired.
Geofences
Geofences in TracX allow you to define virtual geographical boundaries around physical locations on the map. The supported geofence types are:
- Border Express branches
- Customers
- Manifesting
This section explains how you can add, edit and delete geofences. (Note: Specific system access is required for this function, contact IT Support)
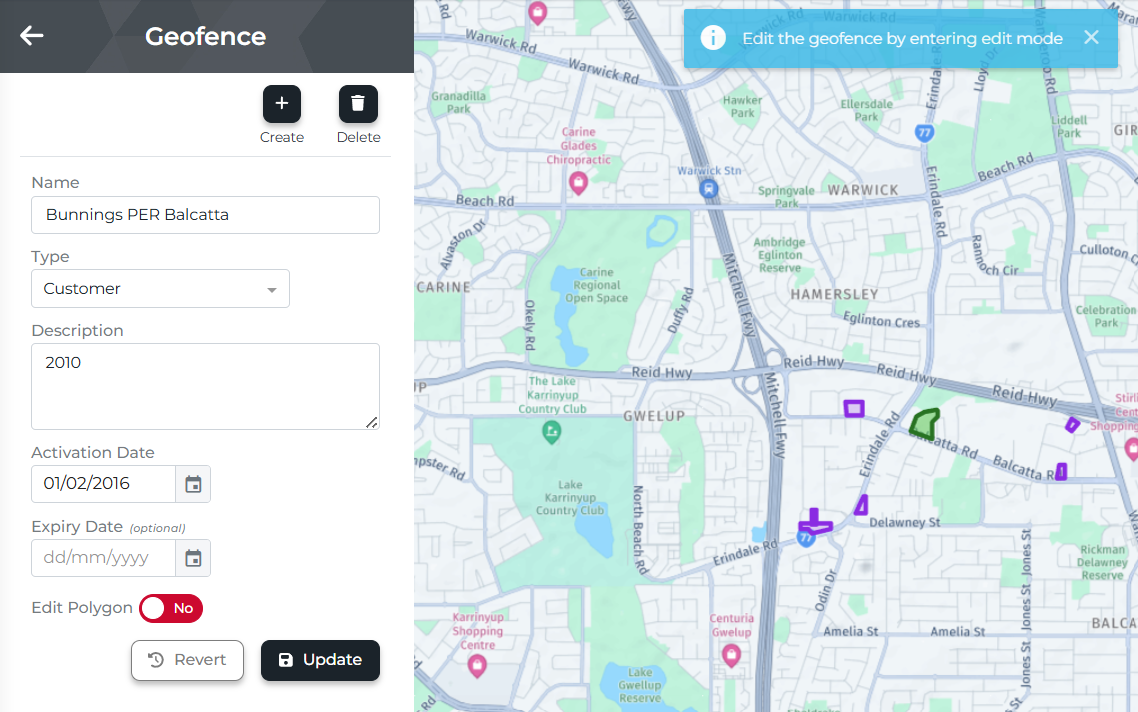
Add new geofence
- From Geofence Search
form
- Click on the Create
button
- Enter the required data - Name, Type, Description and Activation Date. The Expiry date is optional and can be left blank for non-expiring geofences.
- Using the drawing tool on the map, click a starting point and then click at each required point of the perimeter, completing the shape by clicking back on the starting point.
- Drawing mode can be enabled and disabled by clicking on the 'Edit Polygon' toggle.
- The changes can be reversed by clicking on the
button.
- To save the geofence, click on the
button.
- Turn on Satellite view so that you can see the actual site features (e.g. buildings, fences, loading docks, access /driveways, etc.).
- Start at the top left corner of the geofence area and draw in a clockwise direction.
- Use as many nodes as required (a new node is created every time you click on the map in drawing mode) to follow the contour of the site.
- Draw the geofence slightly outside the actual boundary of the site to allow for an amount of GPS signal drift. This will prevent multiple enter/exits in quick succession on the geofence report if a truck is close to the actual fence line. Just be careful if 2 customer sites are side by side.
- To check the geofence is working as expected, run the Time in Geofence report in Transport Suite and review the contact times and durations etc. Edit the geofence as required.
 Edit geofence
- Select an existing geofence by clicking on it's polygon shape on the map.
- You can edit the geofence data - Name, Type, Description, Activation Date and Expiry date.
- To edit the geofence shape - click on the 'Edit Polygon' toggle and drag the border points on the map.
- Drawing mode can be enabled and disabled by clicking on the 'Edit Polygon' toggle.
- The changes can be reversed by clicking on the
button.
- To save the changes, click on the
button.
 Delete geofence
- Select an existing geofence by clicking on it's polygon shape on the map.
- Click on the
button.
- Confirm deleting on the warning dialog box
- Warning - Please note that deleting geofence from the Map is permanent.
Geofence Configuration Rules
Name: (Mandatory)
Example: Dulux AcraTex Beverly SA
Alphabetic listing: While the search function in TracX will search for the term in any part of the geofence name, the geofence list in Transport Suite is a first letter search only. Therefore, the name should start with the name of the customer, branch, etc. as this is what most people will search for. The name should also include the suburb to avoid any confusion for customers who have multiple sites, and end with the state.
Example: Flush Fitness Port Melbourne VIC
Bunnings
Name: It is important to our capability to report to Bunnings, that all names follow the convention of “Bunnings” “Delivery Branch Code” “Store Name.” By having the delivery branch code listed after “Bunnings” allows for all stores serviced by the same branch to be easily grouped.
Example: Bunnings GLD Burleigh Waters
Description: The store number.
Example: 8172
Type: (Mandatory)
Chose from one of the following options:
- Branch: Only use for Border Express branches or agents
- Customer: Use this type for any customer sites.
- Manifesting: Only use for geofences around Border Express or agent sites that are to be specifically used for tracking and alerting arrival and departure times of linehaul vehicles. Generally, these geofences are drawn around the branch in a radius of typically 1 kilometre.
Description: (Mandatory)
Activation Date: (Mandatory)
Expiry Date: (Optional and can be left blank for non-expiring geofences)
Generally left blank so that the geofence does not expire but can be used if a location is known to not be used after a certain date (e.g. closing of a customer site).
Deleting Geofences: (Warning)
Deleting geofences is permanent. Check with the Operations Manager of the associated branch before deleting any geofences in their area.
Related Articles
Border Express Systems Overview
New to Border Express? Here is an overview of the systems you will commonly use. Employee Time & Attendance Comply Time & Attendance Use QR code to log in at site Employee Self Service Comply ESS Employee Self-Service Self Help Training BEX Academy ...How to set Safe Senders in Outlook
Here are simple, user-friendly steps to mark an email sender as safe** across all Outlook versions** your users are likely to use. ✅ Outlook Classic (Desktop – Windows) Best for traditional Outlook app Method 1: From an email (quickest) Open the ...